Deep-learning Processor Unit
Goal
- In this tutorial you will
Build bitstream with Deep-learning Processor Unit
Include Vitis AI libraries in Yocto project
A bit of background
Deep-learning Processor Unit is an IP Core provided by AMD that accelerates deep-learning inference on Xilinx FPGA devices. It’s part of Vitis AI library and facilities running models created with TensorFlow or PyTorch on FPGA. Integration of Deep-learning Processor Unit into Linux distribution follows similar steps as integration of other IP blocks (like double UART from Enable programmable logic support).
Prerequisites
Preset with Processing System configuration from Enable programmable logic support
Yocto project with Programmable Logic support from Enable programmable logic support
Provided outputs
Following files (Tutorial files) are associated with this tutorial:
Leopard/Zero-to-hero/04 Deep learning Processor Unit/arch.json- DPU fingerprintLeopard/Zero-to-hero/04 Deep learning Processor Unit/leopard-dpu-bd.xsa- DPU IP bitstreamLeopard/Zero-to-hero/04 Deep learning Processor Unit/boot-common.bin- Boot firmware for LeopardLeopard/Zero-to-hero/04 Deep learning Processor Unit/nominal-image-leopard-dpu.rootfs.cpio.gz.u-boot- Root filesystem for LeopardLeopard/Zero-to-hero/04 Deep learning Processor Unit/Image- Linux kernelLeopard/Zero-to-hero/04 Deep learning Processor Unit/system.dtb- Device tree
Use these files if you want to skip building bitstream or Yocto distribution by yourself.
Download Deep-learning Processor Unit repository Vivado
On machine with Vivado create
dpu-ip-repodirectory.Download DPU IP block from https://xilinx.github.io/Vitis-AI/3.5/html/docs/workflow-system-integration.html#ip-and-reference-designs.
Use ‘IP-only download’ link for ‘MPSoC & Kria K26’ platform.
Note that DPU IP for Zynq UltraScale+ has version 3.0. That version works fine with Vitis AI 3.5 used in this tutorial.
Unpack downloaded archive to
dpu-ip-repodirectory.Make sure that after extracting, directory
DPUCZDX8G_v4_1_0is directly indpu-ip-repo.
Create bitstream with Deep-learning Processor Unit Vivado
Start Vivado and create new project. In new project wizard select following options:
Project type: RTL Project
Select
Don’t select
Part:
xczu9eg-ffvc900-1L-i
Add DPU IP repository to project
Open settings by clicking on in .
Go to .
Add
dpu-ip-repodirectory to list of repositories.Vivado will show confirmation message and list as newly added IP.
Create top-level block design by using in Flow Navigator. Use
dpu_bdas name.In block design diagram editor add Zynq UltraScale+ MPSoC IP block.
Start customization of Zynq UltraScale+ MPSoC IP block by double-clicking on it.
Apply previously exported preset by selecting and select
leopard-minimalistic-with-pl.tclfile.: Set Data Width to 32.
: Set Data Width to 32.
Add “Processor System Reset” IP block to block design. In Block properties name it .
Connect IP block inputs:
Connect
slowest_sync_clktopl_clk0output port of Zynq UltraScale+ MPSoC IP block.Connect
ext_reset_intopl_resetn0output port of Zynq UltraScale+ MPSoC IP block.
Add “Clocking Wizard” IP block to block design.
Customize Clocking Wizard block by double-clicking on it.
In Clocking Options, set to “Auto”
On Output Clocks:
Set of
clk_out1toclk_2x_dpuSet to ‘200.000 MHz’
Enable
Set of
clk_out2toclk_dpuSet to ‘100.000 MHz’
Enable for both clocks
Enable input
Select to ‘Active Low’
Connect Clocking Wizard IP block inputs:
Connect
clk_in1topl_clk0output port of Zynq UltraScale+ MPSoC IP block.Connect
resetntoperipheral_aresetn[0:0]output port of IP block.
Add another “Processor System Reset” IP block to block design. In Block properties name it rst_gen_2x_dpu_clk.
Connect IP block inputs:
Connect
slowest_sync_clktoclk_2x_dpuoutput port of Clocking Wizard IP block.Connect
ext_reset_intoperipheral_aresetn[0:0]output port of IP block.
Add another “Processor System Reset” IP block to block design. In Block properties name it
rst_gen_dpu_clk.Connect IP block inputs:
Connect
slowest_sync_clktoclk_dpuoutput port of Clocking Wizard IP block.Connect
ext_reset_intoperipheral_aresetn[0:0]output port of IP block.
Add Deep learning Processing Unit IP block to block design.
Customize Deep learning Process Unit block by double-clicking on it.
On tab set to ‘B1024’
Connect Deep learning Process Unit IP block inputs:
Connect
S_AXItoM_AXI_HPM0_FPDoutput port of Zynq UltraScale+ MPSoC IP block.Connect
s_axi_aclktopl_clk0output port of Zynq UltraScale+ MPSoC IP block.Connect
s_axi_aresetntoperipheral_aresetn[0:0]output port of IP block.Connect
dpu_2x_clktoclk_2x_dpuoutput port of Clocking Wizard IP block.Connect
dpu_2x_resetntoperipheral_aresetn[0:0]output port of IP block.connect
m_axi_dpu_aclktoclk_dpuoutput port of Clocking Wizard IP block.Connect
m_axi_dpu_aresetntoperipheral_aresetn[0:0]output port of IP block.
Connect Zynq UltraScale+ MPSoC IP block inputs:
Connect
S_ACI_HPC0_FPDtoDPU0_M_AXI_DATA0output port of Deep-learning Process Unit IP block.Connect
S_ACI_HPC1_FPDtoDPU0_M_AXI_DATA1output port of Deep-learning Process Unit IP block.Connect
S_ACI_LPDtoDPU0_M_AXI_INSTRoutput port of Deep-learning Process Unit IP block.Connect
maxihpm0_fpdtopl_clk0output port of Zynq UltraScale+ MPSoC IP block.Connect
saxihpc0_fpd_aclktoclk_dpuoutput port of Clocking Wizard IP block.Connect
saxihpc1_fpd_aclktoclk_dpuoutput port of Clocking Wizard IP block.Connect
saxi_lpd_aclktoclk_dpuoutput port of Clocking Wizard IP block.Connect
pl_ps_irq0todpu0_interruptoutput port of Deep-learning Process Unit IP block.
Run . When asked about auto assigning address segments, answer “Yes.”
Final block design should look like this:
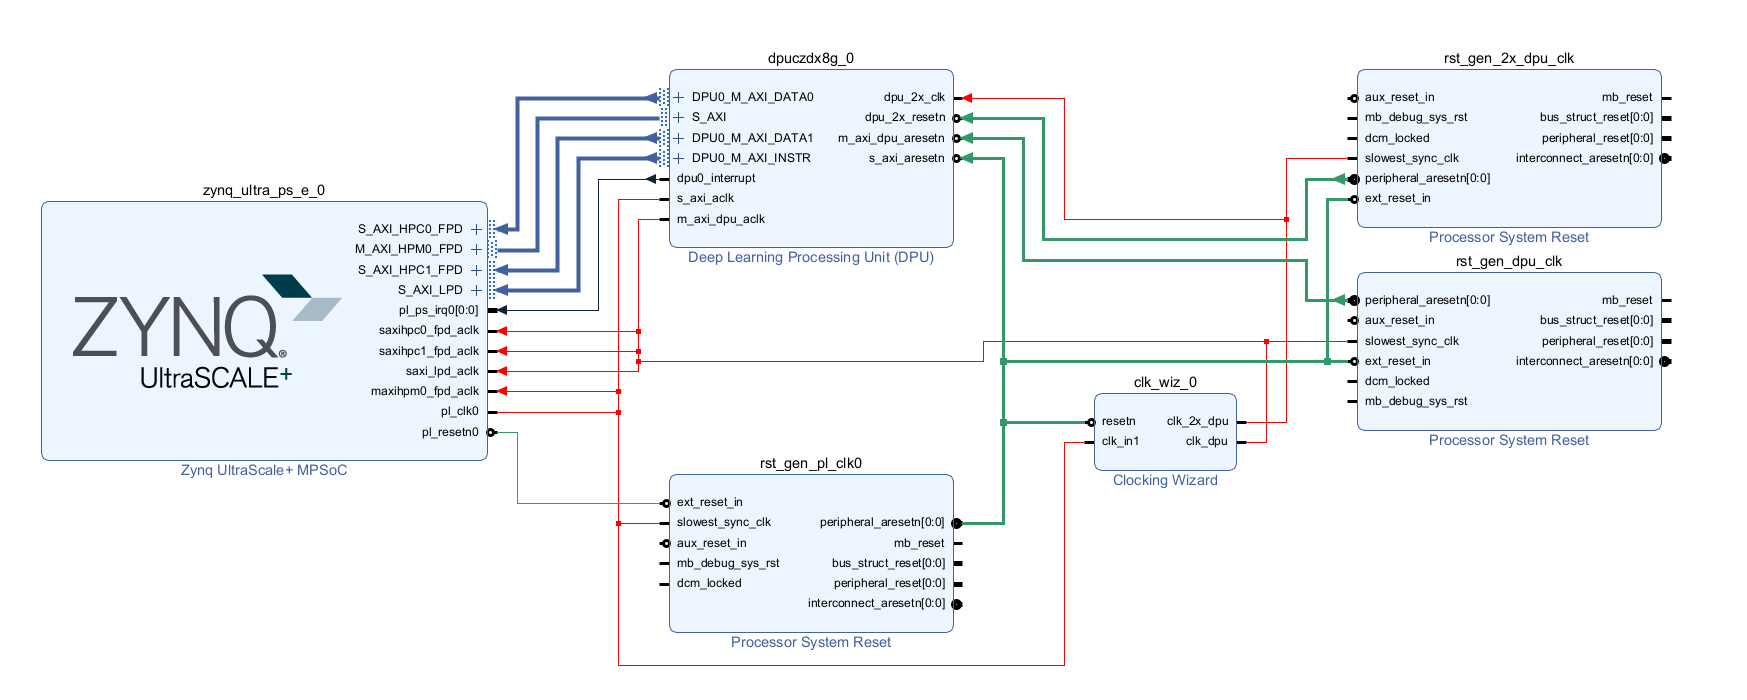
Fig. 11 Block design with Deep-learning Processor Unit
In Sources view select and click in context menu. Use option.
Generate bitstream
Warning
Compared to previous tutorials, generating bitstream might take significantly longer time.
Export hardware including bitstream to file
leopard-dpu-bd.xsa
Add Vitis layers to Yocto Project Yocto
Note
If necessary, re-enable Yocto environment using
machine:~/leopard-linux-1$ source sources/poky/oe-init-build-env ./build
Clone Xilinx
meta-vitislayer:machine:~/leopard-linux-1/build$ git clone -b rel-v2024.1 https://github.com/Xilinx/meta-vitis.git ../sources/meta-vitisClone KP labs
meta-kp-vitis-ailayer:machine:~/leopard-linux-1/build$ git clone -b nanbield https://github.com/kplabs-pl/meta-kp-vitis-ai.git ../sources/meta-kp-vitis-aiApply patches to
meta-vitisthat fix support fornanbieldYocto versionmachine:~/leopard-linux-1/build$ cd ../sources/meta-vitis machine:~/leopard-linux-1/sources/meta-vitis$ git am ../meta-kp-vitis-ai/patches/*.patch Applying: Switch to nanbield Applying: bbappend to any glog versionAdd layers to Yocto project:
machine:~/leopard-linux-1/build$ bitbake-layers add-layer ../sources/meta-openembedded/meta-python
machine:~/leopard-linux-1/build$ bitbake-layers add-layer ../sources/meta-vitis
machine:~/leopard-linux-1/build$ bitbake-layers add-layer ../sources/meta-kp-vitis-ai
Change recipe providing
opencl-icdby adding configuarion option to~/leopard-linux-1/build/conf/local.conf.PREFERRED_PROVIDER_virtual/opencl-icd = "ocl-icd"Note
meta-vitislayer requires particular project configuration
Add Deep-learning Processor Unit bitstream to Linux image Yocto
Create directory
~/leopard-linux-1/sources/meta-local/recipes-example/bitstreams/dpu/and copyleopard-dpu-bd.xsato it.Create new recipe
~/leopard-linux-1/sources/meta-local/recipes-example/bitstreams/dpu.bbthat will install bitstream with DPU.LICENSE = "CLOSED" inherit bitstream SRC_URI += "file://leopard-dpu-bd.xsa" BITSTREAM_HDF_FILE = "${WORKDIR}/leopard-dpu-bd.xsa"Create recipe append for kernel
machine:~/leopard-linux-1/build$ recipetool newappend --wildcard-version ../sources/meta-local/ linux-xlnxCreate directory
~/leopard-linux-1/sources/meta-local/recipes-kernel/linux/linux-xlnx.Enable Xilinx DPU kernel driver module by creating file
~/leopard-linux-1/sources/meta-local/recipes-kernel/linux/linux-xlnx/xlnx-dpu.cfgwith contentCONFIG_XILINX_DPU=mEnable kernel configuration fragment by adding it to
~/leopard-linux-1/sources/meta-local/recipes-kernel/linux/linux-xlnx_%.bbappendFILESEXTRAPATHS:prepend := "${THISDIR}/${PN}:" SRC_URI += "file://xlnx-dpu.cfg"Add new packages into Linux image by editing
~/leopard-linux-1/sources/meta-local/recipes-leopard/images/nominal-image.bbappendIMAGE_INSTALL += "\ fpga-manager-script \ double-uart \ dpu \ vitis-ai-library \ kernel-module-xlnx-dpu \ "Build firmware and image
machine:~/leopard-linux-1/build$ bitbake leopard-allPrepare build artifacts for transfer to EGSE Host
machine:~/leopard-linux-1/build$ mkdir -p ../egse-host-transfer
machine:~/leopard-linux-1/build$ cp tmp/deploy/images/leopard-dpu/bootbins/boot-common.bin ../egse-host-transfer
machine:~/leopard-linux-1/build$ cp tmp/deploy/images/leopard-dpu/system.dtb ../egse-host-transfer
machine:~/leopard-linux-1/build$ cp tmp/deploy/images/leopard-dpu/nominal-image-leopard-dpu.rootfs.cpio.gz.u-boot ../egse-host-transfer
machine:~/leopard-linux-1/build$ cp tmp/deploy/images/leopard-dpu/Image ../egse-host-transfer
Transfer content of
egse-host-transferdirectory to EGSE Host and place it in/var/tftp/tutorialdirectory
Run model on Deep-learning Processor Unit EGSE Host
Verify that all necessary artifacts are present on EGSE Host:
customer@egse-host:~$ ls -lh /var/tftp/tutorial
total 106M
-rw-rw-r-- 1 customer customer  21M Jul 16 10:51 Image
-rw-rw-r-- 1 customer customer 1.6M Jul 16 10:51 boot-common.bin
-rw-rw-r-- 1 customer customer  93M Jul 16 10:51 nominal-image-leopard-dpu.rootfs.cpio.gz.u-boot
-rw-rw-r-- 1 customer customer  39K Jul 16 10:51 system.dtb
Note
Exact file size might differ a bit but they should be in the same range (for example
nominal-image-leopard-dpu.rootfs.cpio.gz.u-bootshall be about ~90MB)Ensure that Leopard is powered off
customer@egse-host:~$ sml power off
Powering off...Success
Open second SSH connection to EGSE Host and start
minicomto observe boot processcustomer@egse-host:~$ minicom -D /dev/sml/leopard-pn1-uartLeave this terminal open and get back to SSH connection used in previous steps.
Power on Leopard
customer@egse-host:~$ sml power on
Powering on...Success
Power on DPU Processing Node 1
customer@egse-host:~$ sml pn1 power on --nor-memory nor1
Powering on processing node Node1...Success
Note
Boot firmware is the same as in Enable programmable logic support.
DPU boot process should be visible in
minicomterminalLog in to DPU using
rootuserleopard login: root root@leopard:~#Load DPU bitstream
root@leopard:~# fpgautil -o /lib/firmware/dpu/overlay.dtboVerify that DPU instance is visible in system
root@leopard:~# xdputil query
{
   "DPU IP Spec":{
      "DPU Core Count":1,
      "IP version":"v4.1.0",
      "enable softmax":"False"
   },
   "VAI Version":{
      "libvart-runner.so":"Xilinx vart-runner Version: 3.5.0-b7953a2a9f60e23efdfced5c186328dd144966,
      "libvitis_ai_library-dpu_task.so":"Advanced Micro Devices vitis_ai_library dpu_task Version: ,
      "libxir.so":"Xilinx xir Version: xir-b7953a2a9f60e23efdfced5c186328dd1449665c 2024-07-15-16:5,
      "target_factory":"target-factory.3.5.0 b7953a2a9f60e23efdfced5c186328dd1449665c"
   },
   "kernels":[
      {
            "DPU Arch":"DPUCZDX8G_ISA1_B1024",
            "DPU Frequency (MHz)":100,
            "XRT Frequency (MHz)":100,
            "cu_idx":0,
            "fingerprint":"0x101000056010402",
            "is_vivado_flow":true,
            "name":"DPU Core 0"
      }
   ]
}
Follow Machine learning model deployment tutorials to train and compile for Deep-learning Processor Unit. Go to Onboard inference to see how to run inference on DPU.
Summary
In this tutorial you walked through steps required to include Deep-learning Processor Unit in FPGA design and integrate it with Yocto project.